Changing your DNS server can be a straightforward process that can help improve your internet browsing experience, enhance security, and even block unwanted content. DNS, or Domain Name System, is essentially the phonebook of the internet, translating domain names into IP addresses that your computer can understand. In this article, we'll guide you through the steps to change your DNS server easily, discuss the benefits of doing so, and provide insights into choosing the right DNS service for your needs.
Key Points
- Understanding what DNS is and its role in internet browsing
- Benefits of changing your DNS server, including improved speed and security
- Steps to change DNS settings on Windows, macOS, and mobile devices
- Choosing the right DNS service provider for your needs
- Security and privacy considerations when selecting a DNS service
Understanding DNS and Its Importance

DNS plays a crucial role in how we access websites and online services. When you type a URL into your browser, your device sends a request to a DNS resolver, which then looks up the IP address associated with that domain name. This process happens in the background, but it’s essential for accessing any online content. The default DNS server provided by your internet service provider (ISP) might not always be the best option, as it can be slow, vulnerable to attacks, or even used for tracking your browsing history.
Benefits of Changing Your DNS Server
Changing your DNS server can offer several benefits. For instance, third-party DNS services like Google Public DNS, Cloudflare DNS, or OpenDNS can provide faster lookup times, which means you can access websites more quickly. Additionally, some DNS services offer enhanced security features, such as filtering out malicious websites, protecting against phishing attacks, and blocking adult content. These features can be particularly useful for families or in public Wi-Fi networks where security is a concern.
How to Change Your DNS Server

Changing your DNS server settings is relatively easy and can be done on various devices. Below, we’ll outline the steps for Windows, macOS, and mobile devices.
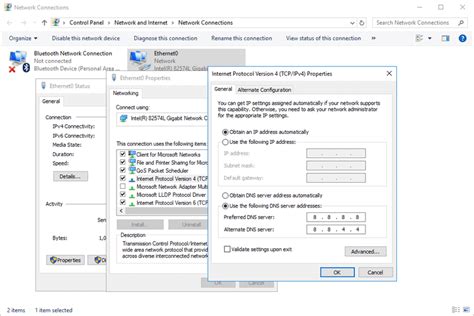
For Windows:
- Open Control Panel and go to Network and Sharing Center.
- Click on Change adapter settings on the left side.
- Right-click on your active network connection (e.g., Ethernet or Wi-Fi) and select Properties.
- Highlight Internet Protocol Version 4 (TCP/IPv4) and click Properties again.
- Select Use the following DNS server addresses and enter the DNS server addresses you want to use.
- Click OK to save your changes.
For macOS:
- Click the Apple menu and select System Preferences.
- Click on Network.
- Select your network connection (e.g., Wi-Fi) on the left.
- Click Advanced, then click the DNS tab.
- Click the + button at the bottom left corner of the DNS servers list.
- Enter the DNS server addresses you want to use.
- Click OK to save your changes.
For Mobile Devices (Android and iOS):
- On Android, go to Settings > Wi-Fi, long-press the network you’re connected to, select Modify network, then Advanced options. You can change the DNS settings there.
- On iOS, go to Settings > Wi-Fi, tap the “i” icon next to the network you’re connected to, then scroll down and tap Configure DNS.
Choosing the Right DNS Service
When selecting a DNS service provider, consider factors such as speed, security features, privacy policies, and whether they offer content filtering options. Some popular choices include Google Public DNS, Cloudflare DNS (which also offers a privacy-focused 1.1.1.1 service), and OpenDNS. It’s essential to review each service’s features and policies to ensure they align with your needs and preferences.
| DNS Service | Speed | Security Features | Privacy |
|---|---|---|---|
| Google Public DNS | Fast | Basic security | Collects some data |
| Cloudflare DNS | Very Fast | Advanced security | Strong privacy focus |
| OpenDNS | Fast | Content filtering and security | Collects some data |

Conclusion and Future Directions
Changing your DNS server is a simple yet effective way to enhance your internet experience. Whether you’re looking for faster browsing, improved security, or more control over the content you access, there’s a DNS service out there for you. As the internet landscape continues to evolve, with emerging technologies like DNS over HTTPS (DoH) and DNS over TLS (DoT) aiming to provide even more secure and private DNS resolutions, staying informed about your DNS options will remain important for safeguarding your online activities.
What are the risks of changing my DNS server?
+While changing your DNS server is generally safe, there are potential risks, such as increased vulnerability if you choose an insecure service or experiencing slower internet speeds if the new DNS server is not optimized for your location.
Can I use multiple DNS services at once?
+Most devices allow you to set primary and secondary DNS servers. This means you can use one service as your primary DNS and another as a backup. However, using multiple active DNS services simultaneously is not typically supported or recommended.
How often should I change my DNS server?
+You don't necessarily need to change your DNS server frequently unless you experience issues with your current service, such as slow speeds or security concerns. It's a good idea to periodically review your DNS service's performance and policies to ensure they still meet your needs.
Meta Description: Learn how to change your DNS server easily to improve your internet speed, enhance security, and block unwanted content. Discover the benefits and steps to switch DNS servers on Windows, macOS, and mobile devices.